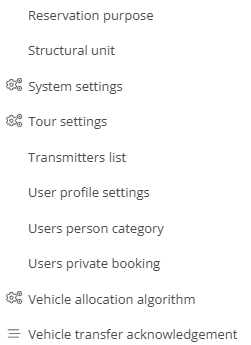
Settings
Under the Settings tab, you can make all possible settings for the Corporate and Public Carsharing system.
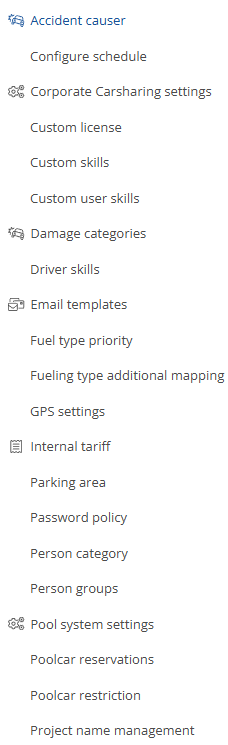
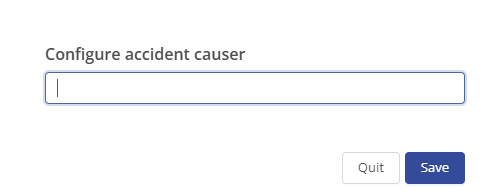
Accident causer:
To add an accident cause, click on  , to edit it , click on
  and to delete it, click on
  .
.

When you add a new accident cause, a new window will open and you can save it with  .
.
To add a schedule, click on 
This will open a window where you can enter the relevant data and then click on  to save.

You can edit  , delete
  or change the status
  at any time, as well as adjust
  the filter to display the desired information.

Corporate Carsharing settings:
This is where you can store the most important settings for your system. These settings will be configured and stored together with you during the training session. For your system to work, the fields marked with an asterisk (*) must be filled in and saved. Here you can specify the earliest time at which the car will be ready for collection and the return time. The cancellation waiting period can be set as required, as can the cancellation percent and cancellation penalty. The same applies to the type of cost calculations type.
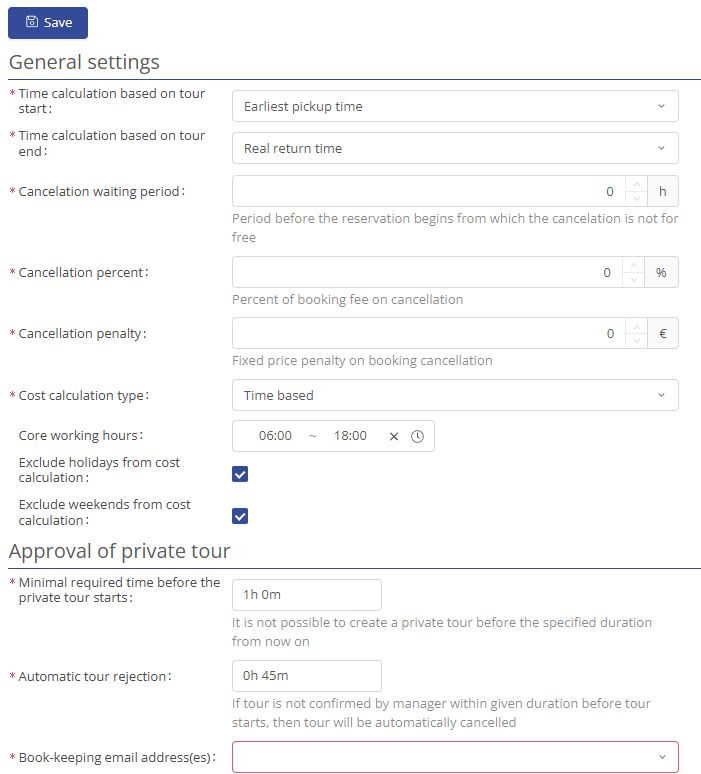
For private tour, you can set when a private tour may be created and when it will be automatically rejected by the fleet manager.
Once you have set all this up, click on  at the top.
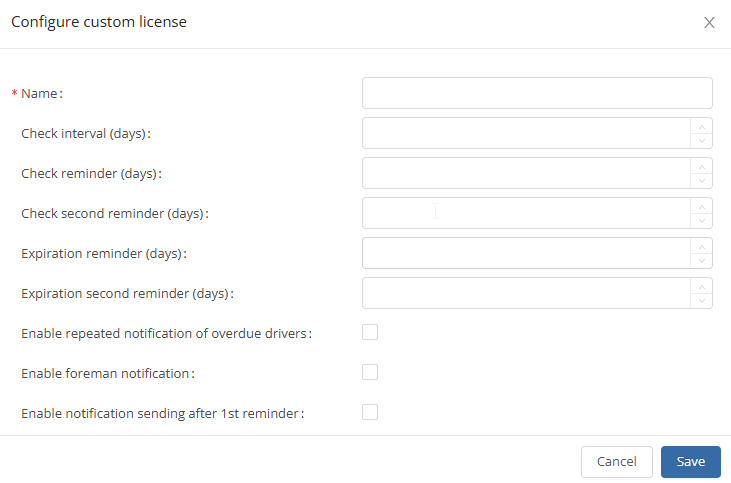
Custom license:
You can edit , delete or  at any time, as well as adjust the filter to display the desired information.

To add an configure custom license, click on and fill in the fields and then click on  to save them.
Custom skills:
In the user-defined skills section, you have the option of creating and editing specially required skills. You can  something, you can use the
  -button to edit something, or delete something by clicking on
  . If you want to refresh you can click on
  . You can use the filter function to select which information or parameters you want to see
  .
.
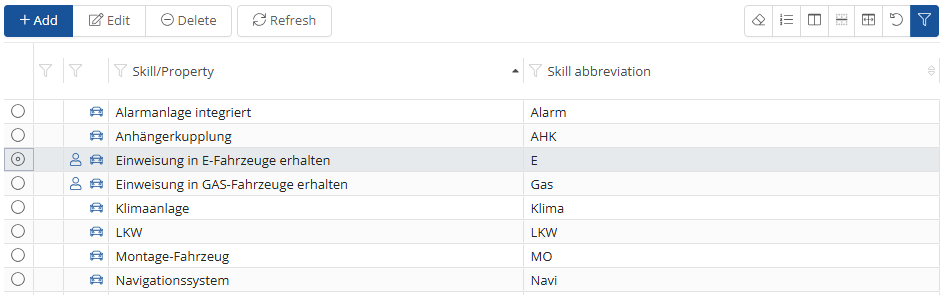
To add a user-defined ability, click on -button. You can then make all the relevant entries in the screen that opens.

You can save the newly created capability by clicking on the -button.
If you want to edit a skill that has already been created, select the relevant skill and then click on the -button.
A window will then open as you know it from adding and you can adjust the settings.
Custom user skills:
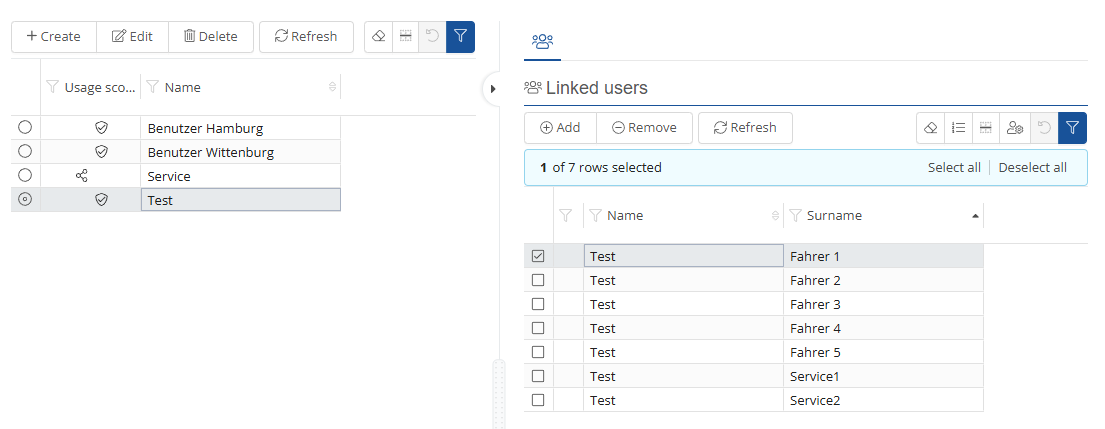
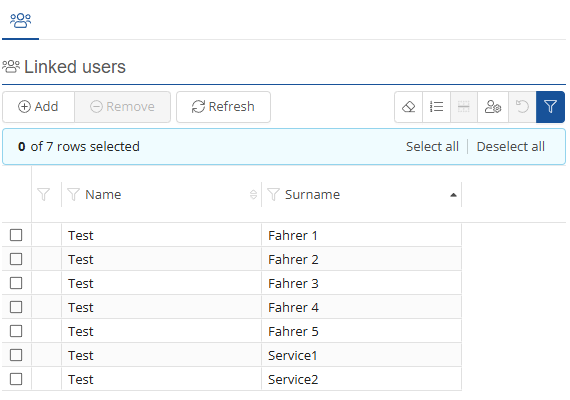
You have the option of assigning specific skills to individual users under the heading of user-defined driver skills.
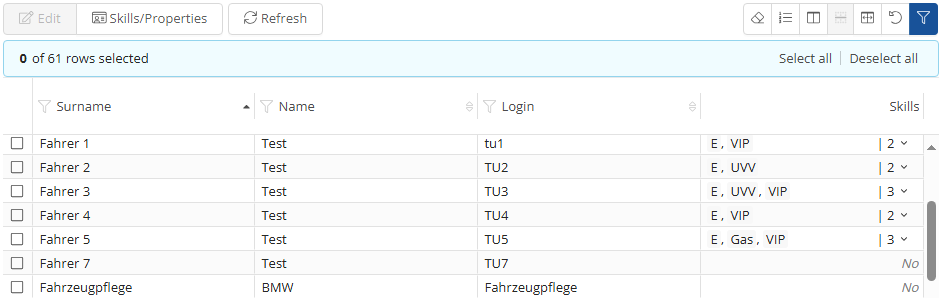
To add a driver skill to a user, select the relevant user and then click on the -button. In the window that now opens, you can select the driver skills that you want to add or remove from a user.
By clicking on the  -button, you have the same options as in the Custom skills menu .
Damage categories:
You can pre-configure accident causes under the accident cause settings. You can also add a damage subcategory. You can add something by clicking on  . You can edit something by clicking on the -button, or delete something by clicking on . If you want to refresh you can click on . You can use the filter function to select which information or parameters you want to see
  .
.
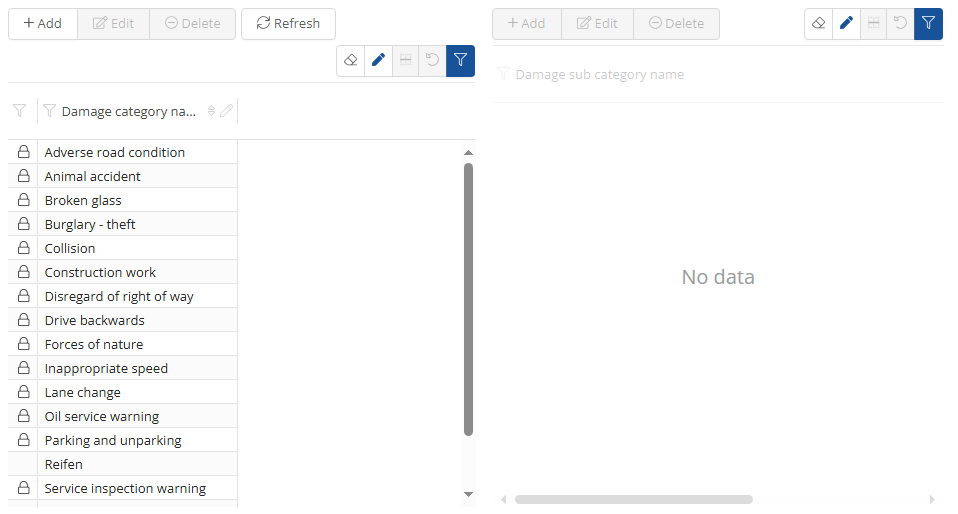
To add a damage categorie, click on the  -button.
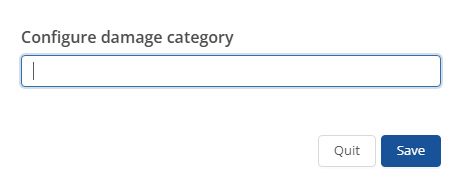
You can save it by clicking the  -button.
Driving skills:
All registered drivers can be displayed here, along with their specific driving skills. You can also filter  by specific drivers.
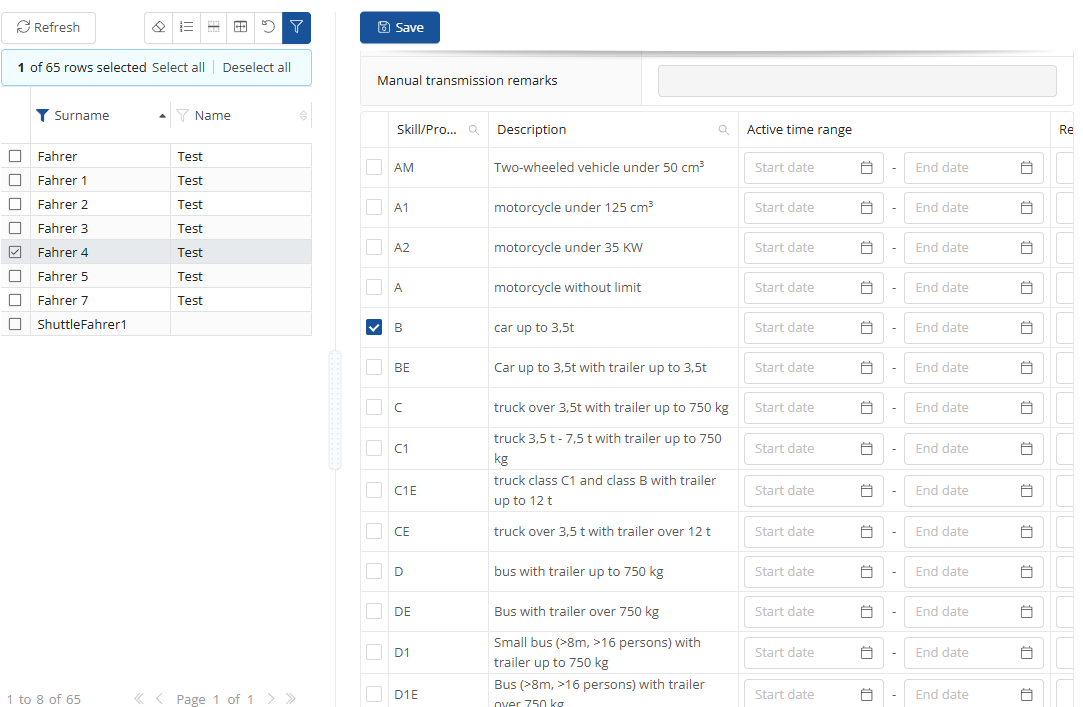
The specific skills are then displayed on the right-hand side, where they can be edited and saved  .
.
Email templates:
In the e-mail templates, you have the option of presetting all automatic e-mails, specifying the recipients and activating or deactivating selected e-mails.
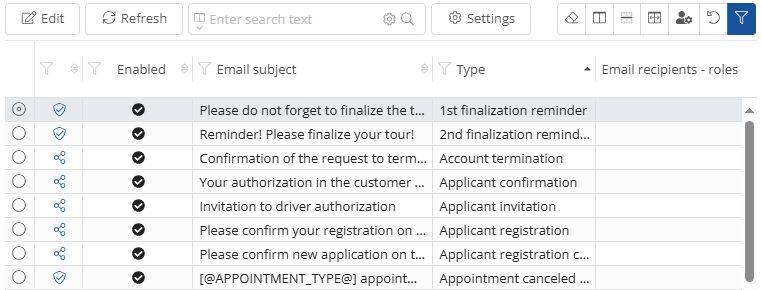
To edit an e-mail, select it and click on the  button. You can then edit the template according to your requirements. Once you have done this, you can save everything by clicking on the -button.
Fuel type priority:
Under the Fuel type priority item, you can specify the priority with which the vehicles are allocated to the drivers.
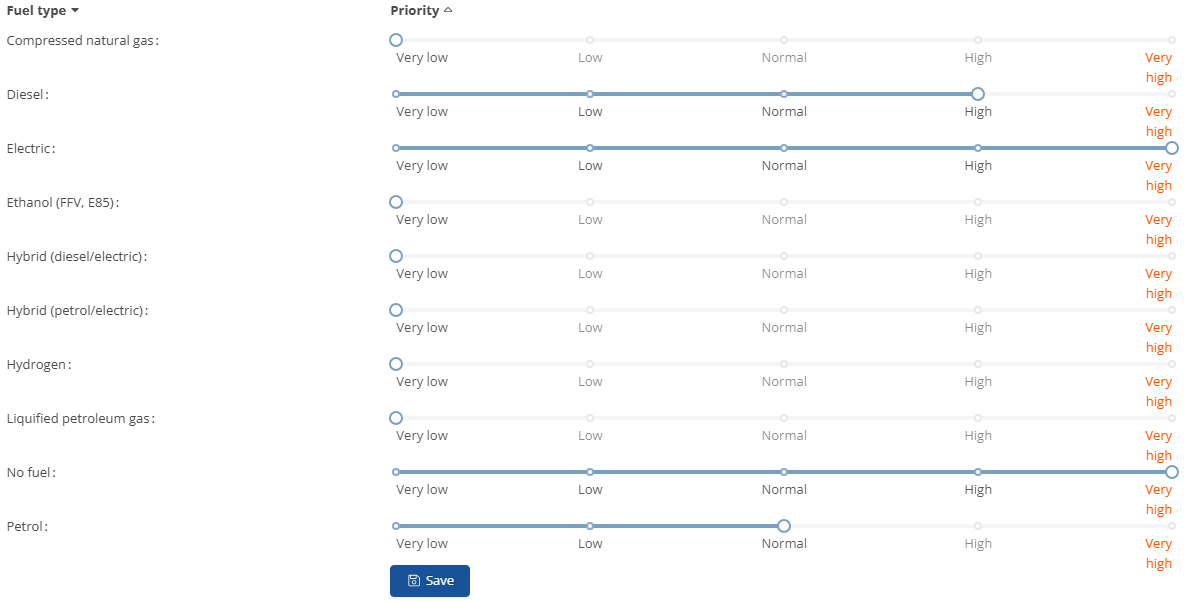
To prioritize a fuel type differently, simply drag the beam with the mouse to the appropriate position and then click on the  -button to save the priorities.
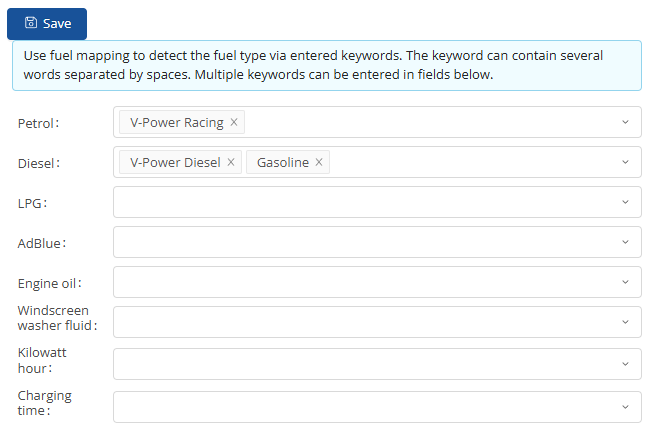
Fueling type additional mapping:
Additional fuel type assignments can be entered and saved here.
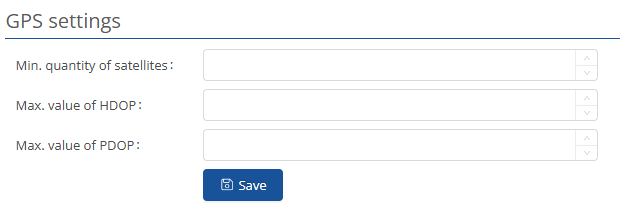
GPS settings:
Here you can enter, manage and save your desired GPS settings and them .
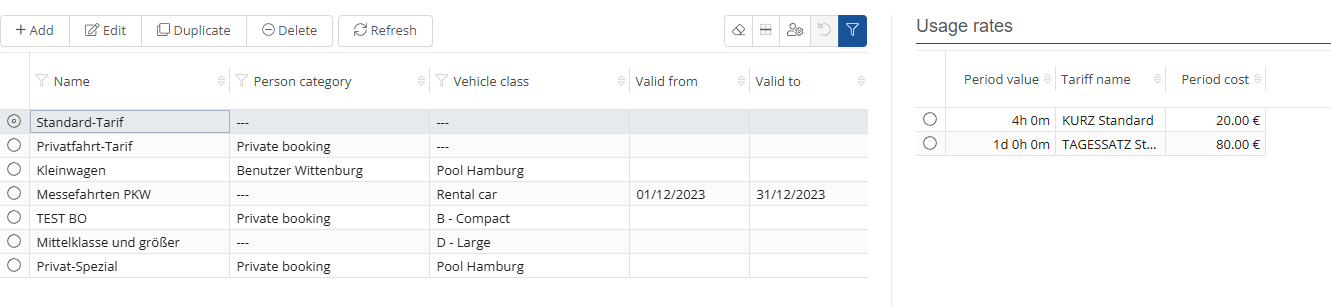
Internal tariff:
You can  something, you can use the -button to edit something, duplicate
  something or delete something by clicking on . If you want to refresh you can click on . You can use the filter function to select which information or parameters you want to see .
Parking area:
In the settings, you can configure with the -button, and parking areas. If you want to refresh you can click on . You can use the filter function to select which information or parameters you want to see .
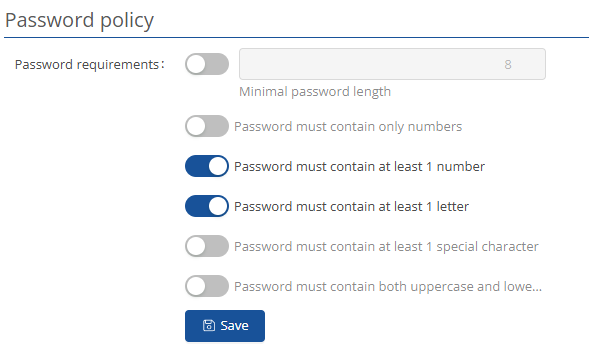
Password Policy:
Here you can set how secure and what characteristics the user passwords should have and them.
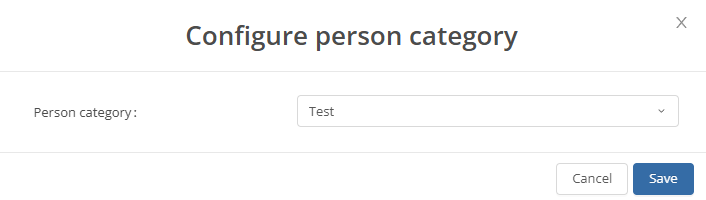
Person category:
In the settings for the person category, you can create category and assign users to them. When creating a category, it is important to specify a name and the area of use, i.e., whether internal or external users are included in this category. You can  something, you can use the -button to edit something, duplicate something or delete something by clicking on
  . If you want to refresh you can click on . You can use the filter function to select which information or parameters you want to see .
If you can add user by click on  or remove someone
  , If you want to refresh you can click on . You can use the filter function to select which information or parameters you want to see .
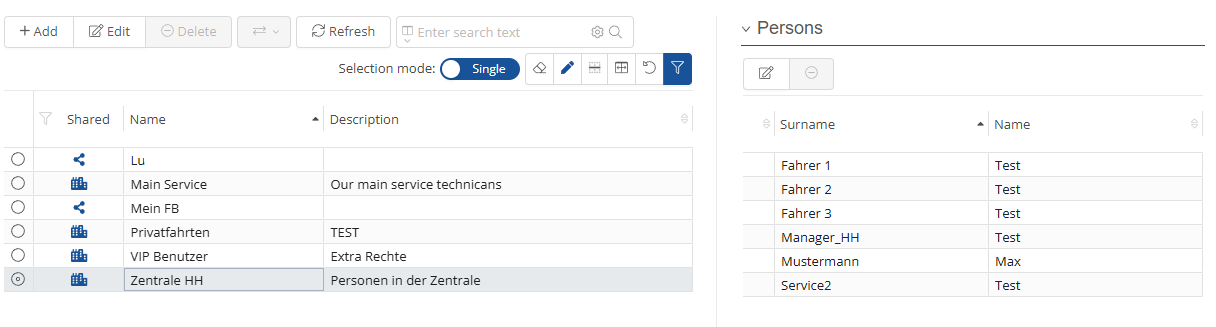
Person groups:
In the “Person groups” area, you can create groups that summarize users, such as employees who work at a common location.
You can add something on the -button, and person groups. If you want to refresh you can click on . You can use the filter function to select which information or parameters you want to see . You can choose the selection on  .
.
When creating a new user group, it will be important to give the group a name and description. You can then assign users and additional administrators to the group. To do this, select the desired users from the list and move them to the right side using the  -button to add them to the group.
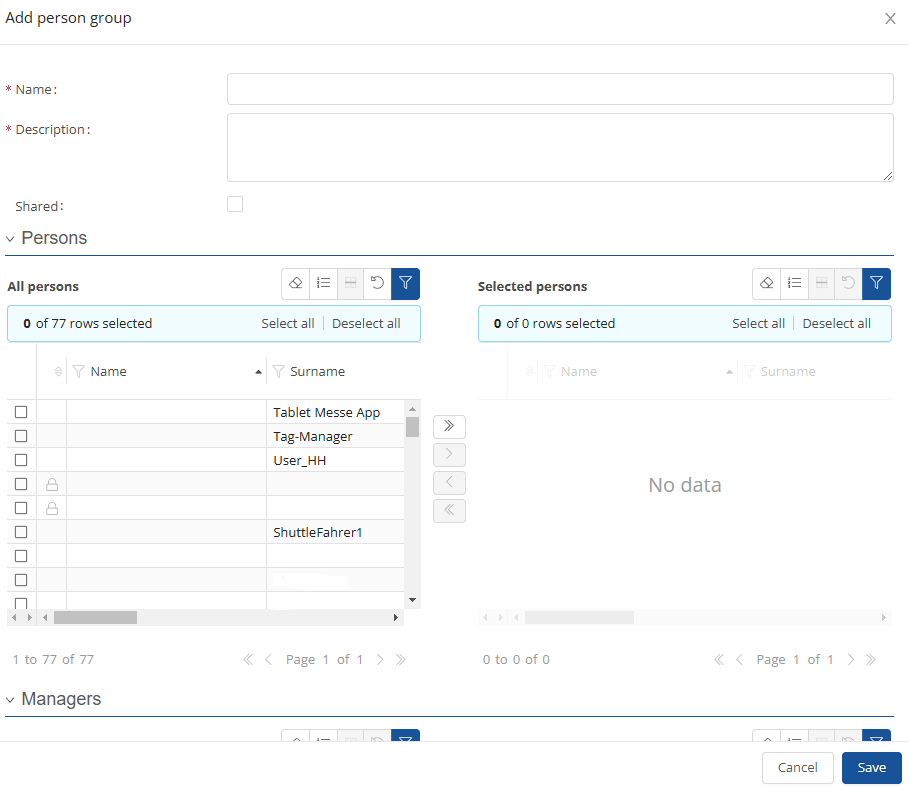
You can save everything by clicking on the -button.
Pool system settings:
In the pool system settings, you have the option of making all settings for the pool system.
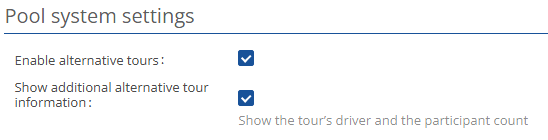
Fields marked with a red asterisk are mandatory fields.
Poolcar reservations:
If you want to refresh you can click on . You can chose you vehicles by selecting them on the filter functions  and create new filters or manage them on
  .
.
In the next menu item of the settings, Pool trolley reservations, you can see all reservations and also make new ones.
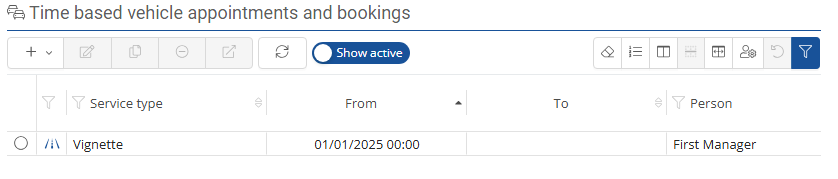
You can use the slider to differentiate between active and all pool car reservations.
|
|
|


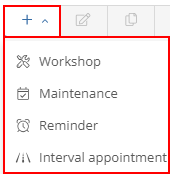
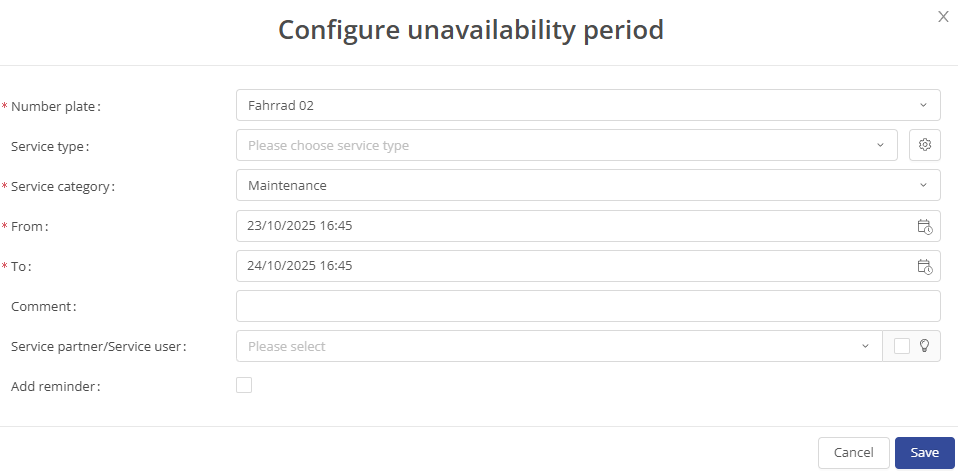
You have the option of making a new reservation via the  -symbol. You can choose between workshop, maintenance, reminder and Interval appointment.
You can use the  -symbol to select a time interval to be displayed.

When you enter an appointment for the workshop or maintenance, a window similar to the driver/vehicle assignment opens. However, here you only need to enter when the vehicle is not available for use. You must then click on  again.
You can edit or delete entries as usual using the familiar  - and
- and  -buttons.
Poolcar restriction:
You can add something on the -button, and person groups. If you want to refresh you can click on . You can use the filter function to select which information or parameters you want to see .
You can click on to configure a poolcar restricition.
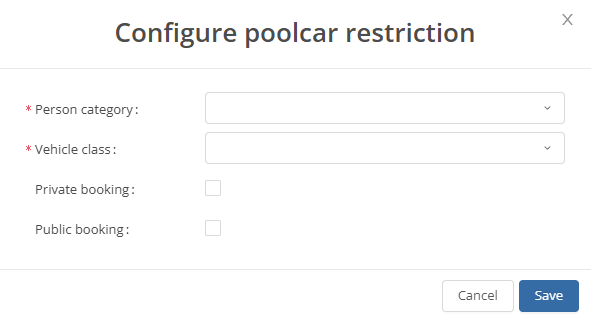
You can save everything by clicking on the -button.
Reservation purpose:
Under this option, you can predefine booking reasons. You can add something on the  -button, and person groups. If you want to refresh you can click on . You can use the filter function to select which information or parameters you want to see .

Structural unit:
In the structural unit settings, you have the option of adding structural units and editing existing ones.You can add something on the -button, and person groups. If you want to refresh you can click on . You can use the filter function to select which information or parameters you want to see .
You can create a new structural unit by clicking on the  -button.
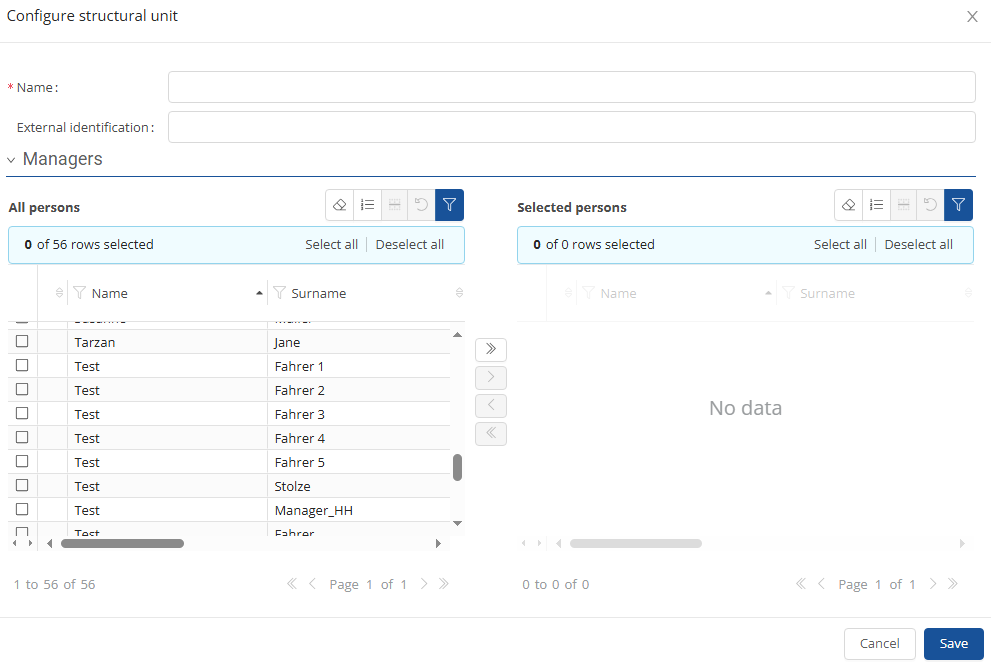
You can save the details by clicking on the  -button.
You can use the  -button to edit an existing structural unit. A screen similar to the one for adding opens.
System settings:
You can make all system-relevant settings in the system settings. From setting which user groups execute ID system services to setting the password length, you have many options here.

Tour settings:
In the tour settings, you have the option of customizing or writing the text of the information banner (ticker text) for users. You can also specify a ticker URL that should be opened when the ticker is clicked.
Pool car manager contacts can also be added.

Pool trolley manager contacts can be added by clicking on the  -button.
You can save the details by clicking on the  -button.
Transmitters list:
You can add something on the  -button, and
  something . If you want to refresh you can click on
  and you can import some by clicking on
  . You can use the filter function to select which information or parameters you want to see .
If you click on  you can add you information's.
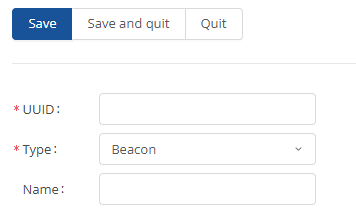
You can save the details by clicking on the  -button.
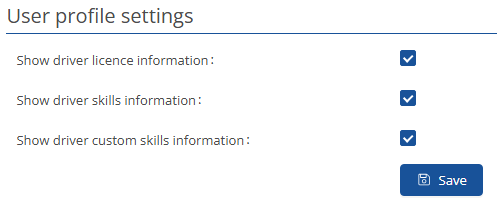
User profile settings:
In the user profile settings, you can check the boxes for what you want to be displayed.
Users person category:
Here you can see which users are in which user category and edit them.
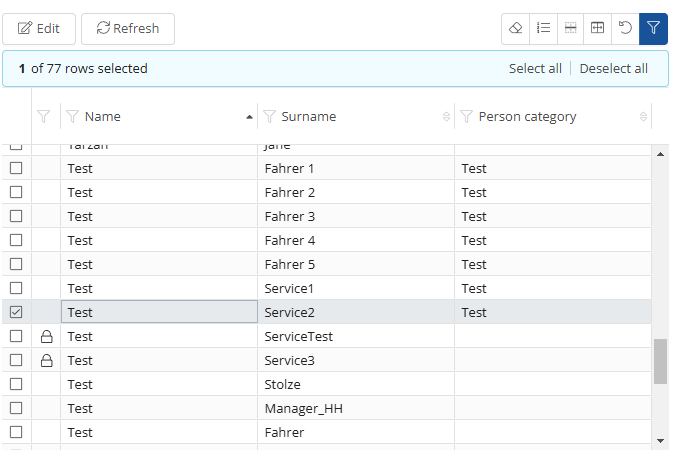
If you click on  you can choose the category.
You can save the details by clicking on the -button.
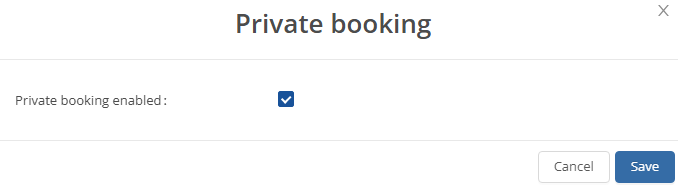
User private booking:
In the “User private booking” section, you can see which users have the private tours feature enabled. If necessary, you can customize this feature directly by  enabling or disabling it.
In addition, you have the option on the right-hand side to configure the settings for a selected user.
Vehicle assignment algorithm:
In the vehicle assignment algorithm settings, you have the option of adjusting the vehicle assignment algorithm for a booking.
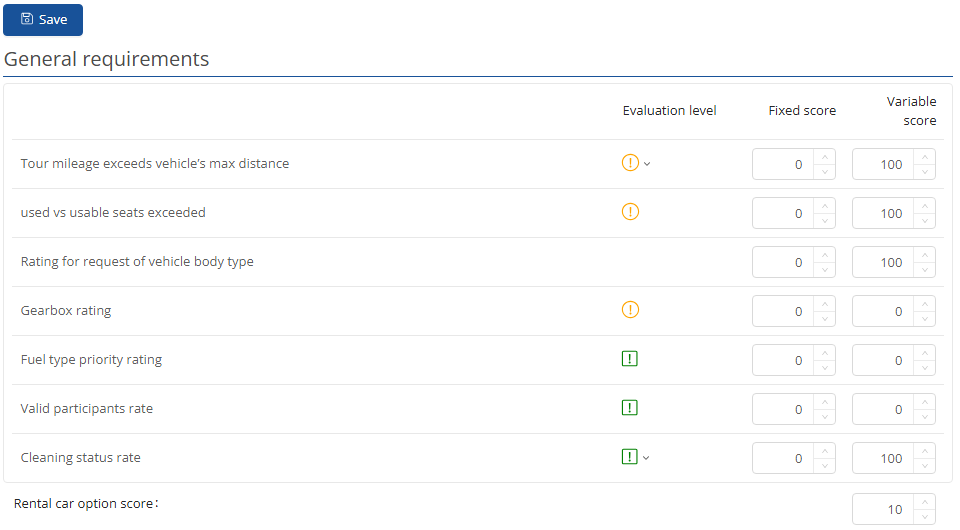
In the general requirements, you can specify the rating with which the search criteria are to be evaluated.
The following evaluation levels are available:
|
Evaluation level |
Icon |
Meaning |
|
Valid |
|
A valid evaluation is based on the number of points evaluated. |
|
Invalid |
|
Invalid ratings are not displayed when booking if the search requirements did not match. However, they can be assigned manually by the fleet manager. |
|
Critical |
|
In the event of a critical evaluation, the vehicles evaluated in this way are not displayed and cannot be assigned manually. |


Scoring:
Each search is individual. In order to find the right vehicle for the corresponding search, a search is awarded points. To generate this rating, the requirements are given fixed and variable points, which ultimately determine the vehicle output.
Fixed points place greater weight on a criterion. The more important it is to you that a criterion is fulfilled in a search, the more fixed points you can assign to the requirement.
Variable points delimit which vehicles receive more points and create the rating for the search results accordingly.
The variable points are added to the fixed points to give a total. The more points a vehicle receives, the better it matches the search criteria.
In order for a rental car to be displayed, you can specify how many points it must achieve in the search in the Car rental option score field.
In the skills selection, you have the same options as in the general requirements, except that these are the skills that a driver must have in order to book a vehicle/ for it to be displayed in the search.
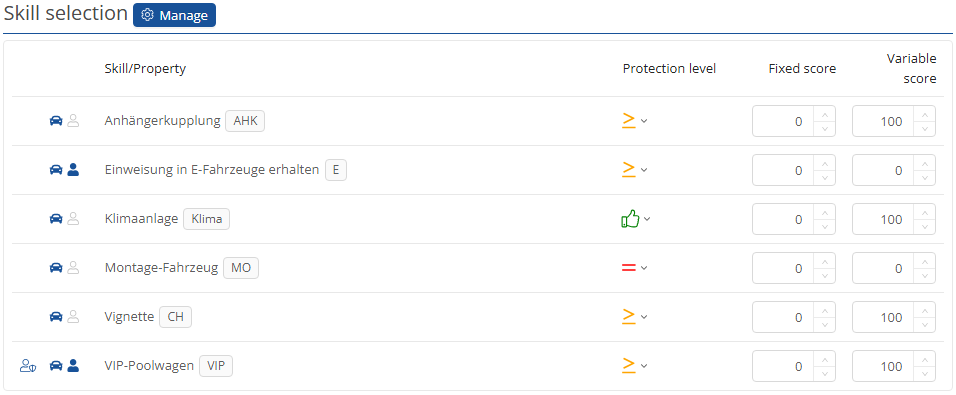
By clicking on the  -button, you have the option of adding further skills to the search selection.
Once you have made all the settings, you can save and apply them by clicking on the -button.
Vehicle transfer acknowledgement:
You can add something on the -button, and person groups. If you want to refresh you can click on . You can use the filter function to select which information or parameters you want to see .
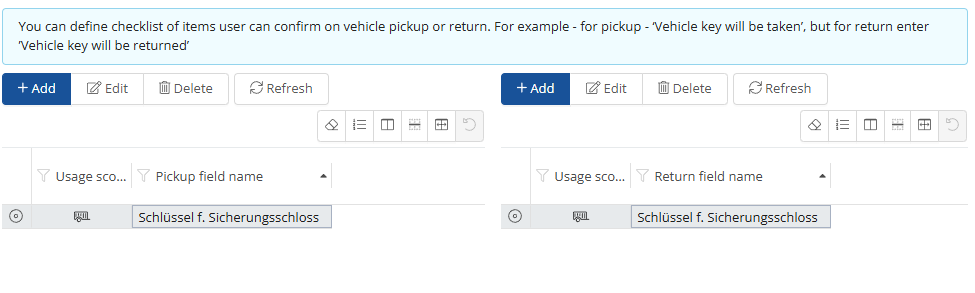
If you click on  you can add you information's.
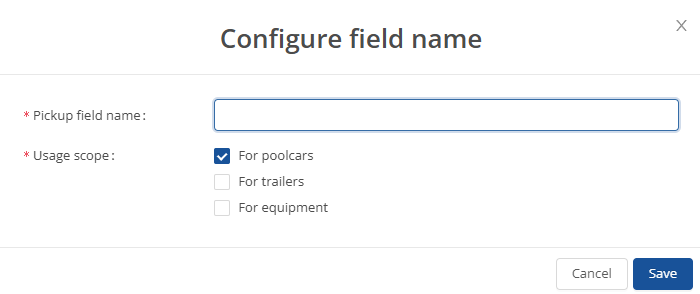
Once you have made all the settings, you can save them by clicking on the -button.